Tuesday, 31 May 2016

Tree guards for apple trees

Apple tree girdling
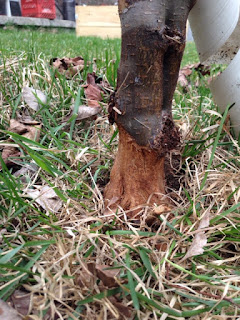
Tree damage from mice:  When I pruned my apple tree I discovered the tree bark at the ground level was eaten by mice over the winter. Over 75% of the bark has been eaten which means the tree won't survive. 
This is called "girdling or ring-barking" and happens when mice or voles chew the bark under the snow. They are drawn to the sugary tasting bark that the tree delivers to the roots of the tree. Ironically the tree guard was in place but was not firmly pushed into the soil. This illustrates the importance of installing a good tree guard when you plant your tree.

You can buy a variety of tree guards on the market and the best one is unconventional. Firstly, the most popular is the expandible 36" white spiral PVC type with holes. They are relatively inexpensive and really easy to install.  Just make sure they are buried under the soil before winter strikes. My favourite is the PVC drainage field tile pipe with holes adapted to serve as a tree guard. Available at The Home Depot, it can be cut to any length and then cut along the length to allow for installation. Many apple tree farmers have adapted the drainage pipe for tree protection. White is the colour of choice to reflect the hot sun but black seems to work fine. The biggest challenge is getting them on without damaging the young tree bark. Firstly, attach the white spiral type to protect the tree bark and then install the drainage pipe over the spiral. Once installed, remove the white spiral. If you are planting a small orchard of trees you may want to invest in a Leonard Tree Guard Zipper that speeds up the install process.  A very cool tool! Protect your investment, my friend.  

Friday, 27 May 2016

How to make soil blocks

2" Soil blocks using Miracle-Gro Mix
I was first introduced to soil blocking in 1989 by author Eliot Coleman in his first book called The New Organic Grower. His ideas and methods on gardening attracted free spirited baby boomers of the 70's and 80's and alike to the idea of growing organically. I must admit that I was hooked and I started to make soil blocks using his well known recipe of compost, peat moss, garden soil, blood meal and other fertilizers.

The idea of soil blocking was well known to the British where the soil blocker was manufactured by Ladbrooke Soil Blocks and it really took roots when Eliot Coleman described how to make this gooey organic mix into square blocks with a hole in the top for seeding. This eliminated the need for plastic or styrofoam pots and made potting up really easy by using larger soil blocks.  Blockers are made in three sizes, 1/4" mini blocks, 2" blocks and 4" large blocks so planting up is easy. I must admit that the 2" block suited my purpose for a short term growing period of 4-6 weeks for cukes, beans and tomatoes. Eliot's original recommendation was to build a wooden box 20" long x 10" wide, open on one side for easy access in the garden, to hold 36 soil blocks 2" square. I still have them today.

Wood tray cleaned & ready
Making the blocks is relatively easy using Miracle-Gro potting mix which contains peat moss, fertilizer, and perlite for drainage. Mix lots of warm water with the potting mix until it runs out when squeezed with your hands. It will have a consistency of moist mud so wear gloves to keep your nails clean. Push the blocker into the mud/soil and twist until the blocker is full. Using a wood stick scrape the bottom to level the soil. Place the blocker on the tray and gently push the blocks out and repeat the process keeping the blocker very close to the previous blocks. There will be a 1/8" space between the blocks that air prunes the roots as the plant grows. I use an old bread knife to separate and lift the blocks when potting up or planting in the garden. Drop the seeds into the top holes and cover with a light dusting of soil and spray with a water bottle.

GBBQ greenhouse tray
I'm experimenting with a BBQ chicken tray/lid as a small greenhouse using the soil blocks. Wash out the container in hot soapy water and drill holes in the plastic lid. Instant greenhouse with humidity control! You can get 9-10 blocks into the tray with a little help and the tray keeps your window sill clean. The cukes germinated twice as fast than others not in the greenhouse!  Just pour water in the tray and the soil blocks will draw up the H20.

The acronym GBBQ (Greenhouse BBQ) may soon become synonymous with soil blocking! );  Try soil blocking, my friend!

Monday, 23 May 2016

How to grow a tomato plant

In this part of the country, Ottawa, ON, Canada, the weather has warmed up and it's time to start planting your garden. In the past most gardeners, including myself, just dug a hole and planted newly purchased plants in their native soil without any fertilizer. However, times have changed and we now collectively strive to produce a better tasting, bigger, healthier and disease free fruit by augmenting the soil with compost, fertilizer and loving care.

It starts in early April when gardeners seed their favourite varieties and nurture them over the next 7-8 weeks. Following a week of hardening off in the outdoors, they are ready for their long adventure in the summer garden.  We are happy and anxious, it's like the kids going off to college!  

A few weeks prior to planting work the soil with your shovel or garden spade and add organic fertilizer. If the soil is heavy with clay add some sand to loosen it up and facilitate drainage. If your soil is a sandy tilth add peat moss or  a Triple Mix Garden Soil containing humus, sphagnum peat moss and compost. Home Depot also has special pricing on Miracle-Gro Premium Potting Mix - 60.5 Litre that can be mixed 50:50 or less into your native garden soil. You can also add sheep manure or mushroom compost to energize your soil.

Take a look at the video below where I explain in detail how I fertilize and grow the beloved tomato plant. Let's get planting, my friend.


Thursday, 19 May 2016

How to grow climbing cucumbers

Sweet Slice Burpless
A member of the gourd family, the noble cucumber (Cucumis sativum) was cultivated in India over 4,000 years ago. In 1494 it arrived on the shores of Haiti courtesy of Italian explorer Christopher Columbus. In the early 1500's there is evidence it was traded and grown in Montreal, Quebec, Canada by explorer Jacques Cartier. Today, cucumbers are grown around the world with China holding the gold medal for the greatest production.

In general terms, cukes are either pickling, slicing or bitterless types and available in a myriad of varieties due to cross breeding. As you may know, cukes take lots of room in the garden so growing them on a trellis is a great idea for urban gardeners.

Pick a sunny part of your garden and start with preparing the earth with compost or organic fertilizer (triple-mix is ideal) and wait until the outdoor temperature warms up before planting your seed. Cukes will not germinate in cold soil so wait until the end of May or first weekend in June (Ottawa, Canada). If you rush them they don't grow and get stunted. Another option is to germinate the seeds indoors using soil blocks (as demonstrated by the Floret Flowers blog in Mount Vernon, Washington) or use Jiffy-7 peat pellets 2-3 weeks before transplanting outdoor. If you purchase plants at the local nursery, carefully plant the whole tray in one location as cukes don't like to have their roots disturbed. Water and work the soil well before planting.

Growing vertical in a small space
When growing on a trellis I overseed them in a row and then cull the weakest plants. The strongest plants should be approximately 6"-8" apart. When they start to grow I help them grow vertically by wrapping the tendrils (green curly arms) around the trellis. Once they get going they will find their way up the trellis. For the past few years I have been using the concrete wire fence in photo, available at Home Depot, supported by a few bamboo poles. Otherwise you can use jute twine (biodegradable) or nylon fishing twine to create vertical support.

One of my favourites is Sweet Slice available at Stokes Seeds. It is a burpless type that you can eat with the skin. Just try it! Wash it, close your eyes, eat it and you can't tell the difference. Another interesting variety is the smaller, sweet tasting, virtually seedless and smooth/thin skinned Lebanese cucumber. The reason cukes are so refreshing is the 96% water content making them also low in calories. In addition they contribute to a recommended daily requirement of Vitamin K.  "Stay cool as a cucumber", my friend.
Sunday, 15 May 2016

How to grow tomatoes upside-down


Defying gravity in your garden: A few years ago the market was abundant with upside-down tomato plants at the Home Depot and local nurseries. It was the rage of garden enthusiasts and created a myriad of discussions at the water cooler and backyard gatherings. Today, it appears that the excitement of an upside-down tomato plant is starting wane in popularity because of it's difficulty to grow, water and manage. However, that has not dampened my determination to defy all odds and succeed at growing cherry tomatoes in this unusual way!

Tomato plants require a large volume of soil (do you remember the photo of the 50" tomato root in my post on March 18th) and lots of moisture as they dry out quickly in the hot sun. In addition the pot gets really heavy and must be secured to a sturdy railing, wall or tree. Understanding these challenges let's get started. I use a fairly large pot around 1 foot square and secure 3 short chains to the pot by drilling holes around the pot edge. The chains will be secured to a steel support that is screwed into my deck about 6 feet off the ground. Using an exacto knife cut a hole in the bottom of the pot big enough to accept a small plant. Then place a small piece of landscape cloth around the hole inside the pot to prevent soil from falling out. Keep the pot away from the tomato stem because when it sways in the wind the pot will cut the stem! Then gently push the plant through the hole and fill the pot with Miracle-Gro Potting mix. One year I tried planting flowers at the top of the pot, however, the flowers only lasted for a short while. The soil capacity was just too small to support the tomato and flowers together.

As the plant grows you will notice the vines trying to reach upwards towards daylight, but as the vine gets larger and laden with tomatoes the weight will bend it towards the ground. I have never had a vine break regardless of the weight. I might add that I always use cherry tomato plants because regular size tomatoes would be too heavy. The real problem is constant watering is required each day and twice a day during the hot summer. I'm also going to try and add more fertilizer and that should help.

You may also want to try the Lee Valley Tools pot that is specifically designed for upside-down plants. It has a unique watering system with a wick. I'm trying one this summer, so I will give you some feedback later in the summer. Topsy-Turvy upside-down, my friend.

Wednesday, 11 May 2016

How to grow potatoes in pots


Growing potatoes in pots is a great idea for city folks who don't have the luxury of a large garden in their backyard. Its also fun, easy and can be one of your first crops to enjoy. Anytime after May 1st is a good time (Ottawa, ON, Canada) to plant and you should harvest small potatoes on Father's Day in mid-June!

To start, purchase disease free certified potato seed from your garden centre. Depending on the size, potatoes can be planted whole or cut into ice cube size pieces before planting. The sprouts are called potato eyes and each piece should have at least one eye. If you cut them, allow them to dry a few days before planting. Apparently if you plant large seeds the plant grows smaller potatoes. If you plant smaller seeds you get fewer but larger potatoes. Strange eh? But let's not be too concerned about this detail.

As you may know, potatoes grow up and not downwards so your planting preparation is different from other crops. You may want to mix a bit of bone meal or other organic fertilizer with the soil prior to planting. Place a 3" layer of soil at the bottom of the pot and place 3 potatoes with the eyes facing up in the pot and just cover them with soil.  It won't be too long before they sprout and when 3-4 inches tall add more soil. Keep adding soil until the plant reaches the top of the pot and that's it. You can use large garbage cans or any container that will hold earth but keep in mind they can get heavy to handle. Keep them well watered during the growing season.

The latest rage is to use a two pot system with the inner pot cut away to harvest the potatoes without dumping the complete pail. When you want to harvest some potatoes, just lift the inner pot from the outer pot and presto - you see potatoes! You can make your own pots by cutting away sections of the pot with a exacto knife and drill holes in the bottom for drainage.

My favourite potato is the Yukon Gold variety that has a waxy yellow flesh with a great taste. It's from Canada, eh? It was developed and released in 1980 by the Department of Agriculture, University of Guelph, Ontario, Canada . Universal in nature, its great for boiling, baking and poutine french fries! Oh, yes, poutine (french fries with cheese curds and brown gravy) - another great Canadian creation by the folks in La Belle Province, Québec, Canada. 1 potato, 2 potato, 3 potato, my friend!

Saturday, 7 May 2016

How to plant an apple tree

Apple Blossoms in May
Your first apple tree: Spring has arrived and this is the best time to plant your apple tree.

Locate your tree where it will get sun 6+ hours a day and ideally where your yard slopes in one direction to drain heavy rain. Drive a wood spike where you want to plant the tree and stand back to visualize a much bigger tree. Dig the hole twice the size of the tree pot and twice as deep, if possible. Remove the top layer of grass and subsoil and place it on a plastic tarp to keep your lawn clean. Place the clay, rocks and debris in another area of the tarp for disposal. I put the latter under my deck where the soil needs to be raised for drainage. Turn the sod upside down in the hole and water the hole and wait for it to drain. The sod will eventually decompose and provide nutrients to the tree.

Purchase some good garden soil and sheep or mushroom manure at your Garden Centre and mix it 50:50 with the native soil you removed from the hole. Do not use inexpensive black earth.  It comes from bogs and is often referred to as black muck. Black earth turns to mud when watered and in my opinion should not be used in a garden. There is a reason it's only $1.00 per bag. The old proverb "dig a $20 hole for a $10 dollar tree" is soooo..... true when it comes to trees!

Ideally, you have watered the tree the day before you plant it. Remove the tree from the pot and place it into the hole. The tree soil should be a few inches above the native grass because it will settle with time. Use your smartphone compass app to determine the westerly direction and orient the tree so the graft is facing the westerly prevailing winds, otherwise the tree will bend and possibly break at the graft. (Look at the trees in your neighbourhood that are in the open field and you will notice they are all leaning towards the east, compliments of the westerly winds) Fill the hole 1/2 way around the tree and water generously. Finally, top up the soil and create a little volcano of soil to direct rain to the root and water once more.

Also, don't forget to place a good tree guard around the tree to prevent mice or moles from "girdling" the tree - eating the bark 360 ° and killing the tree. (this usually happens in winter under the snow) You may also want to drive two stakes (east and west sides) into the ground to support the tree from bending in the wind. Place the stakes on the west and east side of the tree.  Pruning the tree at this time is also a good idea because the growth should go to the roots. Water the tree every week during the first year of growth. Now, go find a great recipe for apple crisp, my friend. 

Tuesday, 3 May 2016

What is a Heirloom tomato plant?

Tomato history 101: Historians have the tomato plant originating from Peru, South America and then spreading to Mexico and Europe by Spanish merchants. Ironically, the tomato plant was imported into Canada and USA by European Immigrants and not by way of Mexico. 

The Heirloom: Prior to the mid-1800's, seeds were collected and exchanged by families and handed down through generations. It was an annual event with farmers collecting and drying seeds for next year's crop. Generally speaking, the seeds produced tomatoes of the same size, colour and taste. We call these open pollinated varieties because the seed can be saved year to year.  Many of these open pollinated types are called heirlooms or heritage because they are steeped in tomato history. One example is the heirloom Purple Cherokee passed down from the Cherokee Indians and yes, it is purplish red in colour. 

Heirloom varieties do come with some drawbacks as they can be more susceptible to disease, irregular in size and shape and may not be the perfect looking tomato as they ripen unevenly. However, heirlooms are noted for having great texture and a perfect balance of sweetness and tartness. Today, gardeners are stepping outside the tomato box and trying different varieties so you see more Heirloom varieties in garden centres. As we know many grocery shoppers tend to pick the best looking tomatoes but that does not equate to a good tasting tomato. Last week I bought great looking hot house tomatoes (Mexico) at the grocery store and they tasted like red corrugated cardboard at best! What was I thinking! 

The Hybrid: During mid to late 1800's seed companies arrived and started to sell seeds, one of them being Stokes Seeds, established in 1881. For the next 70 years or so, seed companies sold open pollinated varieties until Burpee's Seeds introduced the first hybrid tomato in 1949 called Burpee's Big Boy. This breeding technique resulted in a new generation of hybrid plants. A hybrid is created when the pollen of one plant is applied to the pistil (yes) of another plant which results in a new tomato variety from the two parents. The new hybrid plant then has the dominant traits of the parent plants. Plants bred this way tend to be stronger, are less susceptible to disease, produce tomatoes of similar size, good tasting and look great!  However, gardeners cannot save hybrids seeds year-to-year because the offspring would be unpredictable.

In closing: Some heirlooms like the Heirloom Brandywine have potato leaf foliage while the Hybrid Ultra Boy bears the regular tomato leaf shape. This is possible because they both belong to the solanaceae plant family. You may also see plants at your garden centre that have potato roots grafted to a tomato stem a plant that produces tomatoes and potatoes on the same plant.  Weird, eh? But true. A topic for another day. Garden on, my friend.