Saturday 8 October 2016

Apple Crisp Recipe

5 varieties from my dwarf tree
It's early October and it's time to harvest your apples and make apple crisp! I got about 65 nice apples from my 5-in-1 dwarf tree this year and that should make plenty of crisps and pies over the next few months. You can find plenty of recipes on the net or in your paper cookbooks, so heat your oven up to 350 deg and let's get started. 

I must admit that I love my hand cranking apple peeler that my son Justin purchased for me some time ago. It peels and cores the apple in seconds and makes the process easy-peasy! Mine comes from Lee Valley Tools but you can find them at Walmart, Bed Bath and Beyond and Canadian Tire. They make a great gift and you might be rewarded with a pie!
Hot from the oven
APPLE CRISP
6 medium apples
1 teaspoon cinnamon
3 tablespoons white sugar
3/4 cup brown sugar
1/2 cup butter
1/2 cup of flour
1/2 rolled oats (adds great texture)

Peel and core apples and toss them with the cinnamon and sugar. Cut the brown sugar, butter, flour and oats together and spread over the apples. Oven temperature 350 deg F for 40 minutes. Serve with ice cream, cream or nada. Better make a double recipe because it won't last long. It's time to make apple crisp my friend.

Tuesday 4 October 2016

How to make a compost bin using FREE Wood Pallets

Free wood pallets
Last week I drove by this pile of wood pallets and it got me thinking about making a compost bin before winter arrives. The pallets are piled at the roadway for anyone wishing to haul them away for firewood or alternative projects. They are free! 
I loaded up three heavy-weight pallets and took them home with the intention of making a compost bin. After securing them with 3" screws I placed them next to my rotating compost barrel that I built last spring.

Click on the YouTube video below and see how to construct this bin with a really fancy and removable front panel. I used a power saw and a nailing gun but keep in mind that you can use a hand saw, hammer and nails or drill and screws to build this bin. Some pallets are much lighter than others, so pick the ones that are suitable to your strength and ability to move them.

First stage
I plan on using this bin #1 as the first stage to composting kitchen waste, coffee filters, egg shells, grass, leaves, flower clippings and farm manure. Once it starts to decompose I will move it to the rolling compost bin for the final stage. Using a two bin system will increase my ability to produce more compost in a growing season. Virtually everything that I once put into the city recycling bin gets composted in my back yard. Let's get building my friend.


Thursday 22 September 2016

Tomato Fall Harvest

Today is the first day of fall, September 22nd.  The daily temperature is (°20C/°68F) and the tomato plants are still full of unripened green tomatoes slowly ripening on the vines. It has been a good year for tomato production and time has come to give you some observations and feedback on the 6 varieties in my garden.

Fresh from my garden
Better Boy Hybrid was a heavy hitter. It is my biggest plant, 6 feet tall and full of big tomatoes. The orange tomato in the basket is half ripened but it gives you an indication of size. I understand why this hybrid variety is one of the most popular in North America. This is my first year growing this variety. One note: when growing this variety from seed, approximately 30% of the seedlings succumbed to a disease. However, the surviving seedlings grew without any problems and produced lots of tomatoes. If you are interested in a high tomato production with big tomatoes for your sandwiches, this is my recommendation.

ULTRA BOY HYBRID has been on my grow list for many years. The tomatoes are not as big as Better Boy hybrid, but they are great tasting and an early producer.

BRANDYWINE HEIRLOOM a non-hybrid plant (you can save the seed for the next year) was my first attempt with an heirloom variety. This pink variety in the basket is medium average in size, more susceptible to odd sizes, uneven ripening with green stripes at the top. The interior had fewer seeds and had a softer sweeter taste and made me think of the wine connotation. The plant was a slow starter but caught up to the size of the hybrids, but did not produce as many tomatoes, as expected.

CHEROKEE PURPLE HEIRLOOM was also slow to grow at the seedling stage and once it hit the ground running. With time, the plant took off and produced huge tomatoes, some hitting the scales at 2 lbs. However, I noticed when the flower clusters formed, many flowers were dropped leaving only 1-2 flowers to develop into tomatoes. That could be genetics? Or may be the high summer temperatures that cause flower drop? As with the Brandywine, some shapes were irregular with uneven ripening. I also noted the tomato splitting where the flower formed. This is definitely genetics along with the dark purple colour that is produced. When sliced the tomato has a red colour! I has a great taste and I will grow them again next year. 

Great colouring and taste
CHOCOLATE SPRINKLES HYBRID GRAPE TOMATO is a relatively new and small variety sold in small packages of 10 seeds. As you can see below, it is a beautiful tomato with green and orange colours. With few seeds and great taste this tomato is great for snacks, salads and the BBQ. Stick them on a bamboo stick and put them on the BBQ. They will not explode like other cherry toms and WOW the sugar content explodes on your plate! This will be my go-to small tomato for next year.

SUNRISE BUMBLE BEE CHERRY TOMATO was my selection for my upside down hanging tomato plant adventure. As I covered in a previous post growing plants upside down is time consuming (watering) because of the small soil capacity of the pot.  This cherry tomato is very sweet tasting and full of juice. However, I found the skin to be tough. I'm not sure if this is genetics or stress related due to the small pot. I let the plant dry out and left the tomatoes on the vine to ripen out as you can see in the photograph.

MY OBSERVATIONS: 
Growing a variety of tomatoes can be interesting and full of adventure. Tomatoes don't need to be perfect - cut away the blemishes and enjoy. The organic fertilizer that I used in the spring planting has increased production. A top dressing of home made compost was applied in early July.
Organic composted tea from farm manure was also watered into the soil.


Good luck with your harvest, my friend.

Friday 16 September 2016

How to grow Raspberries

Growing raspberries in your backyard can be very satisfying if you have the space for this fast growing fruit. I recall the first time I purchased raspberry plants on-line from a nursery - I didn't know what to expect. One day they arrived by snail-mail Canada Post and upon opening the package I discovered 15-20 sticks about 12" long with small roots at one end! At the time I had a large garden so I tilled a section about 3' x 24' with my Troy 8 HP garden tiller. Needless to say I was very optimistic!  I planted the  "sticks" about 2 feet apart in the soft soil and mulched them with some left over straw. Over the summer the sticks sprouted green leaves and started to grow....and grow....and grow. It soon became apparent that raspberry plants are fast growing and spread their roots underground. The next spring I tilled each side of the plants to keep the plants from spreading more and they took off producing hundreds and hundreds of beautiful raspberries. It was magical!

Since my first experience with raspberries, we have moved to the city and space is at a premium but the thought of growing raspberries was always on my mind. Then one evening around the BBQ with friends Val and Gerry, they mentioned "we have a ton of raspberries in our small backyard" and that got me thinking.......

Two years ago I picked up 4 small pots of raspberries at Home Depot with my intentions of planting them immediately.  Not so. As time went on the plants sat at the back of my garden shed in the shade where I watered them occasionally. Winter arrived and I forgot about the plants until the following spring when I found them fallen over and partly covered with snow. They looked like dead sticks in a pot! With nothing to lose, I righted them and kept them watered until I saw a small green sprout! They were still alive! 

As the ground began to thaw I dug a trench for the new "tenants" - removing grass and stones behind my shed, a space that I don't use or see. I mixed in some farm manure compost with the native soil a planted them about 2' apart. During the first year they grew but did not produce any fruit. 

The following spring the plants took off and looked very healthy but it wasn't until August a second generation of growth shot up 3 feet and produced a massive amount of berries. We are now in mid-September, the weather is still nice around mid 20 deg C, and we are picking raspberries.

I would recommend a dark-red berry called "Boyne"  that's Canadian, eh? Originated in 1960 at the Morden Research Centre in Manitoba as a cross between Chief x Indian Summer varieties, it is hardy in zones 3 to 6 and is a great producer of large fruits. It likes full sun if possible and should be fertilized after planting and in early summer.

I use compost "tea" - a mixture of farm compost and water that has been steeped.  This organic fertilizer will provide your plants with a healthy dose of nitrogen, phosphorus, calcium, potassium, magnesium and other nutrients to keep your plants green and productive. Grow raspberries, my friend.

Thursday 8 September 2016

Dwarf Apple Tree with 75 apples

It's early September and my apple tree is full of apples. It appears that we will get an abundance of apples for our annual apple crisp bake-off!  
This dwarf tree has been pruned to about 6 feet tall and has 5 different apple branches grafted on a non-apple rootstock that will keep the tree short and manageable. Great for a small garden or city backyard folks who want to grow an apple tree but don't have space for the larger varieties.
My variety is a M7 or M9 type that will stay around 6'-10' (I'm not sure of the exact type because it only said dwarf on the tag). The M designation comes from the East Malling Research Centre in jolly old England where research has catalogued 1,000's of apple trees from centuries past. Hence the letter M precedes the designated number. That's enough about the details.
I counted 75 apples on the tree! Pretty amazing considering the size of the tree and the damage caused by mice ringing the tree during the winter. However, so far the tree has survived and I plan on harvesting them in early October.
Take a look at the You Tube video below and hopefully you will get inspired to plan an apple tree next spring. Plant an apple tree, my friend.


Friday 26 August 2016

How to grow Yukon Gold potatoes in pots

My favourite potato is the Yukon Gold variety that has a waxy yellow flesh with a great taste. It's from Canada, eh? Developed and released in 1980 by the guys and gals working at the Department of Agriculture, University of Guelph, Ontario, Canada, a potato throw from where my daughter grows heirloom tomatoes in her garden.
Potato haul in August
On May 1st I planted 3 seed potatoes (cut in half) with one sprout showing on each seed in a 5 gallon bucket (recycled from my neighbour's new evergreen trees)  filled with a mixture of Miracle-Gro potting mix, Triple-mix soil, farm manure and a dusting of my organic fertilizer mix. To start, I just covered the potatoes and as they continued to grow, I kept adding soil until they reached the top of the bucket. I must admit that I watered
them virtually every day due to our hot summer weather that reached +30°C - 88 °F almost every day! The plant was huge, growing 3' tall until one day in mid-August the plant leaves dropped and dried up.  Time to harvest! As I mentioned before, I grow potatoes in pots for a July-August harvest. I especially like Yukon Gold mashed potatoes with butter, salt and pepper. The golden yellow colour and buttery taste goes well with roast beef and green beans from the garden!

This photo shows a bounty of 20+ potatoes in the bottom of the black growing barrel. That's a ratio of 1.5:20 potatoes in one pot!  After adding a caption, flag, date and blogger URL it looks like a poster for Yukon Gold Potatoes! August, a great month to harvest, my friend.

Friday 19 August 2016

Growing Beets

Carillon long shaped beets
If you like cooked or pickled beets then this variety is for you! I've been growing this long cigar shaped beauty for many summers and I have found it to be the best tasting cooked beet on the market. The variety shown is called Carillon that can grow up to 12" long but I harvest them around 6" in length. The shape is unique and not like your standard round Detroit style variety. Aside from it's shape, the taste is wonderful especially when covered with butter. Opps.... did I say butter?  You will also notice the absence of white rings while the interior is ruby red. 

When cooking, keep the root and leave about 1" of stem on the beet otherwise the natural juices will run out in the pot. Gently boil for about 30-45 minutes depending upon the size. Once cooked, run them under cold water and the skin will fall off without any effort. Now they are ready to be chopped or served full size (small ones) in your dinner plate. If you like pickled beets, chop them up in slices for easy pickling in the fall. The beet greens are also full of vitamins and can be steamed and eaten with kale. The beet greens have more iron content than Popeye's spinach including many other health benefits covered on the net. 
Carillon Beets growing with my tomatoes

Another great use of beets is to make a traditional Russian Borscht soup or search the net for alternative recipes. 

This year I planted seeds in my soil blocks and got them going before they reached the garden. It's best to keep the plants 1-2" apart in rows about a foot apart. This year I'm growing them at the foot of my tomato plants and they are doing well. The good news is, they are relatively free of bug and disease. If you want to store them, they will keep for several months at a very cool @ 32°F/0°C.  Stay healthy and grow beets my friend.

Friday 12 August 2016

Cherokee Purple Heirloom Tomato

Cherokee Purple Heirloom
This is my first summer growing Heirloom tomato plants (non-hybrid) and this is an update on their progress. As the history pundits purport, this purple coloured tomato originated from the Cherokee Indians living in Tennessee over 100 years ago. The seeds were passed down by generations of families who loved the taste of this seed saving beauty. Thats right, you can save heirloom seeds year-to-year and get the same genetics from the previous plant.  

You cannot save seeds from hybrid tomatoes like Ultra Boy and expect to get the same plant genetics, therefore you need to purchase seeds from a grower like Stokes Seeds. 

In the early 1990's, tomato rock star Craig LeHoullier was given seeds belonging to the purple tomato plant. After growing the plant and being impressed with the quality, he named it "Cherokee Purple" and sent samples to the Southern Exposure Seed exchange and eventually became available to the general public.

It's appearance is purple with a splash of green on top, until fully ripe. The taste is sweeter and has a texture unlike your standard hybrid. The interior is plump and has fewer seeds that your average hybrid. However, some tomatoes did have a scab growth on the sides known as "cat facing" but it was easily removed before eating. In my situation, I have attributed the cat facing scab growth to cool growing conditions in June when we had one week of very cold temperatures. The cool day and night temps affected the pollination of the flower which causes scab growth. Once the spring temperatures warm up, the next set of flowers should be free of this physiological condition. See this link for greater detail.

Another observation when growing this plant is how slow it was to grow during the first 4 weeks under the grow lights. It was much smaller that the hybrids and when it hit the ground it was again slow to grow. However, it eventually caught up to the hybrids in height and the early tomatoes were hugh! This 4.5" purple beauty was too heavy for my 16 oz. kitchen scale so I can only estimate it to be 1-1/2 to 2 lbs. Go ahead and make great toasted tomato sandwiches, my friend.

Thursday 4 August 2016

Cat-facing and Blossom End Rot Tomatoes

Cat-facing
Both of these photographs are examples of Physiological conditions especially affecting large tomatoes and Brandywine is one of them.
The first photo is a condition called Cat-facing which could be caused by cool day and night temperatures around 15-18°C 60-65 °F which I believe is the cause. This tomato was one of the first to flower during a one week period of very cold weather in June. High nitrogen in the soil and over pruning could be another cause, but I have ruled them out in this case. 
With the cat face removed, the tomato was delicious! Do you see the cat face? Perhaps one of those long-haired flat faced Himalayan cats?  ðŸ˜„

Blossom end rot (BER)
The second photo was taken by Justin, a dedicated tomato grower, who experienced Blossom end rot (BER) on his first Brandywine tomatoes. This Physiological disorder is caused by lack of calcium within the plant. This can happen when the pH is outside the ideal range of (pH 6.2-6.5). The addition of lime will raise the pH and add calcium, however, if you believe your soil is within the pH range, then the cause may be lack of water when the plant is growing quickly. We are experiencing prolonged hot weather 29-34°C  84-93 °F therefore moisture variations or drought stress can reduce calcium uptake. One recommendation to prevent this disorder is to add calcium based agricultural gypsum and ground egg shells when planting, but nothing is guaranteed. Also, adding Epsom Salts at the planting and watering stages will help with the intake of nutrients to the plant. The good news is, BER is usually limited to the first clusters of flowers and dissipates with the following flower sets. Who would have thought, tomatoes and science together!  Garden on my friend.

Tuesday 2 August 2016

How to grow tomatoes upside-down v2

Bumble Bee Sunrise Cherry Tomato
Earlier this spring I planted a Bumble Bee Sunrise Cherry tomato in a hanging pot that I got as a gift from a budding gardener.The upside down container kit composed of a pot, specialized 2 part bottom ring to feed the plant through and a top water reservoir that wick feeds the plant with water. In principle, you keep the pot full of water and it wick feeds the plant. 

This allows you to play golf or go fishing and not worry about watering every day! ðŸ˜„

The plant was a little slow off the start but eventually started to grow - until 2 months when it started to wilt. I removed the top reservoir and discovered the plant to be very dry. The wick was clogged with a white substance and was no longer working. I think the substance was Epsom Salts that I occasionally use as a fertilizer. It appears, while being wick fed, it reverted back to a hard crystal. I've since removed the water reservoir and added my freshly made compost to the top.  

This summer, the temperature in Ottawa, ON, Canada has been very hot with temps averaging 29 C - 34 C so I've been watering this plant every day! An ideal temperature for growing tomatoes is between 21 C and 29 C.  If the plant gets too many hot days it will drop it's flowers or fruit similar to an apple tree in June. I've noticed that the plant produced virtually thousands of flowers but many were not converted to fruit. Flower drop can be very prevalent in hot weather or when the plant is stressed. In addition, hot nights above 21 C will also contribute to flower or fruit drop. Lack of water or a large fruit set will also cause flower drop. Who said gardening was easy!


Water fed wick
The same observation was made with my other mainstream tomato plants. The second and third generation flowers are not producing as much fruit as the first set. Or - are my expectations too high? Regardless, I expect a bumper crop of tomatoes and I have not seen any BER (Blossom end rot) so far.  Topsy-turvy my friend.

Saturday 23 July 2016

Chocolate Sprinkles Hybrid Grape Tomato

Beauty is in the eyes of the beholder..... It's July 19th and we have our first tomato!  Its' called Chocolate Sprinkles (Hybrid Grape Tomato) - UT338B and as you can see, the tomato is beautiful. It bears red/orange stripes on a rich green background. The overall oblong size is 1-¼" long by 1" and it has a dark "chocolate" interior with few seeds. I found the skin a bit thick, however, it posed no problem when eating the fruit. The tomato is more meaty as compared to your average smaller "Sweet 100" cherry 1" style with greater  juice content.

This variety took some time to start growing as a seedling and when planted in the ground, however it has since taken off and is 5 feet tall with plenty of flowers and new baby toms. It is a new indeterminate variety offered by Stokes Seeds that should be staked and requires an estimate of 70 days from when the plant hits the ground to harvest. Seed suppliers claim it is resistant to fusarium wilt (F1), nematodes (N), and tobacco mosaic virus (TMV) and that can't be a bad thing.

I would recommend this marbled tomato for your salad because of it's taste and visual appearance. I'm also anxious to try them on a BBQ skewer. Their meaty interior may prevent them from "exploding" on the grill. A real beauty to grow, my friend.

Saturday 16 July 2016

Potato harvest in pots - 10 weeks growth

One potato, two potato, three potato, four...... you get the idea. After 10 weeks growth, two Yukon Gold seed potatoes in a pot has produced 15+ potatoes. This is good news considering we did not have potatoes for Father's Day at 7 weeks growth. The purpose of growing potatoes in pots, in my mind, is to have fresh potatoes from the garden in July. Once the potatoes have dried, store them in a brown paper bag at room temperature and clean them just before preparing them for the kitchen table.
One observation I made when harvesting is the dryness of the soil. I watered my pots almost every day, yet the bottom of the pot was dry. It's now apparent that the large potato foliage requires a tremendous amount of water when grown in a confined pot. However, the ratio of 2 seed potatoes to the 15+ harvested is reasonable. Now let's go BBQ, my friend.


Monday 11 July 2016

How to grow climbing beans

Healthy Growth
This could be a bumper year for climbing beans in my backyard!  It has been 49 days since I planted climbing Blue Lake Pole Bean seeds and they are growing with exceptional vigor. The flowering vines have reached 10 feet in height and they are falling over the trellis reaching for the sky. I've also noticed that the leaves are bright green and free of insect damage. So what have I done differently this year to produce such awesome plants?

Before planting, I dug in a dusting of my magic formula of organic kelp, fish, alfalfa and bone meal combination. I also added some well composted farm manure that I collected from a local equestrian stable. In addition, had warm weather this spring and that has contributed to fast and healthy plant growth. When the plants were about 3' tall I applied 2-3 inches of manure compost to retain moisture and discourage the weeds. Shortly after this application the plants shot up! I can't help thinking of the magic beans Jack in the Beanstalk! 😄


Sunny morning after rainfall
I've also been watering them occasionally with a nutrient rich manure tea brew that is high in nitrogen. To make the brew add 2 shovels of composted manure into a large garbage can and fill it with water. Another option is to fill an old pillowcase with manure and tie it off. This will keep the solids from mixing with the tea but is not essential to the outcome. Using a stick or shovel mix the brew and let it sit.
The tea brew will be dark brown colour and should be mixed with water. I use a two gallon watering can 1/4 with the brew and top it up with water. The tea brew will look like weak tea and will go directly to the plant roots.

This organic fertilizer will provide your plants with a healthy dose of nitrogen, phosphorus, calcium, potassium, magnesium and other nutrients to keep your plants green and productive. Feed your magic beans, my friend.

Wednesday 29 June 2016

Growing potatoes in pots - 7 weeks growth

Potato pot 7 weeks growth 
In early May I planted potatoes in pots with a hopeful expectation of producing small potatoes for Father's Day in June. As you will see in the attached video the plants were hugh but did not have any flowers. Regardless, I was determined to see if it could be done, so I recorded the 7 weeks results with great expectation! 
Unfortunately, we did not have potatoes for Father's Day :(  
The plant was huge - 3 feet tall - but had no flowers. Perhaps there was too much nitrogen or it just needed more than 7 weeks to produce flowers and small potatoes. Since I have other pots in production, I will try again at the end of July.  Garden on my friend.


Saturday 18 June 2016

Pruning suckers from tomato plants

Pruning suckers is a hotly debated subject with tomato growers and it's practice will vary depending upon your time, effort and beliefs. Prior to pruning suckers, I recall tomato plants growing into a tangled mess of vines with one plant trying to take over space from the others, especially when planted 2 feet apart. However, the plants still produced plenty of tomatoes although a bit smaller than the seed companies purported they would be in size. Tomato rock star Craig LeHoullier of "Epic Tomatoes" comments on suckering plants but his short segment appears to suggest that it is subjective depending upon intended results being the number of tomatoes and the size.


Tomato sucker in my garden
What is a sucker? It's a shoot that grows out of the joint where a branch intersects the main stem. If left alone it will grow into a full size branch that will set flowers and fruit. This new branch will also produce suckers that will repeat the same growth pattern exponentially. This results in a huge, bushy and sprawling plant. If you use large tomato cages and they are spaced 3+ feet apart the plant is manageable but any closer it becomes a jungle that Tarzan would find difficult to maneuver. 

Keep in mind that pruning will reduce the number of tomatoes but may increase size. Which is more important to you?  More tomatoes or bigger tomatoes? I have taken a middle stance on this issue by pruning some suckers especially on the lower level of the plant. Firstly, when planting I remove the leaves at the soil level as bury as deeply as possible. The buried stem will produce more roots to feed the plant. Once the plant starts to grow I remove the lower leaves that are wilting or damaged by insects. As the plant continues to grow I remove all the branches and suckers below the first group of flowers. At this point you will notice 2-3 main stems (1 original stem and 2 suckers that have become main stems). Most experts say 2-3 stems is sufficient to produce many and large tomatoes but again this is subjective; and relative to the size of the cage and the distance planted.

As an extreme example of pruning suckers is the way greenhouse growers grow tomatoes. They space the plants 18" apart and prune to 1 stem wrapped around a string growing to a height of 7-8 feet tall. Backyard gardeners don't go to that extent but it illustrates how pruning can vary.

As you can see, pruning can vary in process and subjectivity.  So if you dare, prune on, my friend.

Saturday 11 June 2016

DIY Composting barrel v2

DIY rolling compost barrel
Composting at home is a great way to reduce your landfill footprint by recycling your kitchen and yard waste into a rich compost that will benefit your soil and plants. As you know from a previous post, I built a rolling compost barrel from a used olive barrel purchased from a local recycling firm for $17.00.

For the past four weeks, I have been adding egg shells, coffee grounds/filters, tea bags, vegetable scraps, grass clippings, dead flowers, native soil and some composted horse manure into the rolling bin. The barrel is rotated every 1-2 days and watered to keep the medium moist but not wet. If the barrel smells I add more brown material and if it does not heat up I add more green materials. Ratios can vary but more brown over green is better. 


Over time you will notice small red wiggler worms, scientifically known as "eisenia fetada" which are a breed of earthworm adept to working their way through decaying organic material. Oddly, they are not usually found in native backyard soil but they are extremely beneficial to the transformation of garden waste to compost so lets welcome them with open arms! Sort of.....


The advantage of a rolling bin v.s. a stationary compost pile is the time required to produce a finished compost material. Most pundits say that a rolling compost barrel will finish in about 3-4 weeks v.s. 6+ months for a pile. In addition, raccoons, rabbits are discouraged because they can't get into the barrel. When completed, the compost can be mixed with native soil or used as a top dressing for vegetables and flowers. Some pros of this magical product are:
  • Helps to retain moisture in sandy soils
  • Enhances air and water drainage in heavy or clay soils
  • Maintains a pH level benefiting plant growth
  • Keeps the soil penetrable allowing for optimal root growth
  • Prevents erosion of the soil bed
  • Provides a natural environment for earthworms and organisms
  • Contains macro and micronutrients necessary for optimum plant growth
Adding compost to your garden is the most organic means of transforming native soil into a crumb texture full of nutrients. 

The following video will show you how the barrel is turned to provide oxygen and speed up the decomposition of raw materials.

In addition you will get an update on "growing potatoes in pots" previously posted on May 11, 2016. Compost on, my friend.


Monday 6 June 2016

Hidy-ho, neighbour "do you have any manure?"

Brown Swiss herd
Milk, anyone?  It was early one morning around 6am I was having my coffee and I noticed them at the fence line. 

The warm morning sun was starting to rise in the east and the dense fog was starting to lift. The wind was unusually calm and it was very peaceful with the chirping of birds in the distance. As I started to photograph them, they turned their heads toward the camera with great interest. The morning sun was low and warm with colour creating patches of light on the herd, the composition was asymmetrically pleasing,  the fog created visual senses and the colours blended into a pleasing palette. Every morning around 4am the herd is milked and turned out to pasture to graze on the lush green grass, and that leads me to the point of this post.

One summer, my neighbour graciously offered me the contents of a very old wood corn silo that was falling down. It was filled with corn cobs that decomposed into a sweet smelling organic material. How lucky could I be!  Get to know your neighbours especially if they have animals or even if they don't have animals ðŸ˜„ . The former, may have animal manure that needs to be piled, disposed and often given away. My current supply of manure comes from an equestrian riding stable that happily gives decomposed manure to anyone with a garbage can, shovel and strong arms. The manure is laden with small red wiggler worms that convert the manure to sweet smelling compost ready for the garden. That's pure gold to a backyard gardener. As Earl Hindman (Mr Wilson Wilson) on the sitcom Home Improvement would say "Hidy-ho, neighbour" my friend.

Tuesday 31 May 2016

Tree guards for apple trees

Apple tree girdling
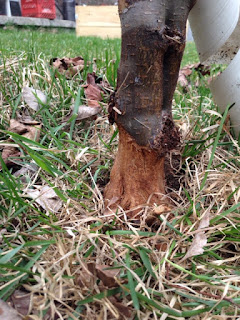
Tree damage from mice:  When I pruned my apple tree I discovered the tree bark at the ground level was eaten by mice over the winter. Over 75% of the bark has been eaten which means the tree won't survive. 
This is called "girdling or ring-barking" and happens when mice or voles chew the bark under the snow. They are drawn to the sugary tasting bark that the tree delivers to the roots of the tree. Ironically the tree guard was in place but was not firmly pushed into the soil. This illustrates the importance of installing a good tree guard when you plant your tree.

You can buy a variety of tree guards on the market and the best one is unconventional. Firstly, the most popular is the expandible 36" white spiral PVC type with holes. They are relatively inexpensive and really easy to install.  Just make sure they are buried under the soil before winter strikes. My favourite is the PVC drainage field tile pipe with holes adapted to serve as a tree guard. Available at The Home Depot, it can be cut to any length and then cut along the length to allow for installation. Many apple tree farmers have adapted the drainage pipe for tree protection. White is the colour of choice to reflect the hot sun but black seems to work fine. The biggest challenge is getting them on without damaging the young tree bark. Firstly, attach the white spiral type to protect the tree bark and then install the drainage pipe over the spiral. Once installed, remove the white spiral. If you are planting a small orchard of trees you may want to invest in a Leonard Tree Guard Zipper that speeds up the install process.  A very cool tool! Protect your investment, my friend.  

Friday 27 May 2016

How to make soil blocks

2" Soil blocks using Miracle-Gro Mix
I was first introduced to soil blocking in 1989 by author Eliot Coleman in his first book called The New Organic Grower. His ideas and methods on gardening attracted free spirited baby boomers of the 70's and 80's and alike to the idea of growing organically. I must admit that I was hooked and I started to make soil blocks using his well known recipe of compost, peat moss, garden soil, blood meal and other fertilizers.

The idea of soil blocking was well known to the British where the soil blocker was manufactured by Ladbrooke Soil Blocks and it really took roots when Eliot Coleman described how to make this gooey organic mix into square blocks with a hole in the top for seeding. This eliminated the need for plastic or styrofoam pots and made potting up really easy by using larger soil blocks.  Blockers are made in three sizes, 1/4" mini blocks, 2" blocks and 4" large blocks so planting up is easy. I must admit that the 2" block suited my purpose for a short term growing period of 4-6 weeks for cukes, beans and tomatoes. Eliot's original recommendation was to build a wooden box 20" long x 10" wide, open on one side for easy access in the garden, to hold 36 soil blocks 2" square. I still have them today.

Wood tray cleaned & ready
Making the blocks is relatively easy using Miracle-Gro potting mix which contains peat moss, fertilizer, and perlite for drainage. Mix lots of warm water with the potting mix until it runs out when squeezed with your hands. It will have a consistency of moist mud so wear gloves to keep your nails clean. Push the blocker into the mud/soil and twist until the blocker is full. Using a wood stick scrape the bottom to level the soil. Place the blocker on the tray and gently push the blocks out and repeat the process keeping the blocker very close to the previous blocks. There will be a 1/8" space between the blocks that air prunes the roots as the plant grows. I use an old bread knife to separate and lift the blocks when potting up or planting in the garden. Drop the seeds into the top holes and cover with a light dusting of soil and spray with a water bottle.

GBBQ greenhouse tray
I'm experimenting with a BBQ chicken tray/lid as a small greenhouse using the soil blocks. Wash out the container in hot soapy water and drill holes in the plastic lid. Instant greenhouse with humidity control! You can get 9-10 blocks into the tray with a little help and the tray keeps your window sill clean. The cukes germinated twice as fast than others not in the greenhouse!  Just pour water in the tray and the soil blocks will draw up the H20.

The acronym GBBQ (Greenhouse BBQ) may soon become synonymous with soil blocking! );  Try soil blocking, my friend!

Monday 23 May 2016

How to grow a tomato plant

In this part of the country, Ottawa, ON, Canada, the weather has warmed up and it's time to start planting your garden. In the past most gardeners, including myself, just dug a hole and planted newly purchased plants in their native soil without any fertilizer. However, times have changed and we now collectively strive to produce a better tasting, bigger, healthier and disease free fruit by augmenting the soil with compost, fertilizer and loving care.

It starts in early April when gardeners seed their favourite varieties and nurture them over the next 7-8 weeks. Following a week of hardening off in the outdoors, they are ready for their long adventure in the summer garden.  We are happy and anxious, it's like the kids going off to college!  

A few weeks prior to planting work the soil with your shovel or garden spade and add organic fertilizer. If the soil is heavy with clay add some sand to loosen it up and facilitate drainage. If your soil is a sandy tilth add peat moss or  a Triple Mix Garden Soil containing humus, sphagnum peat moss and compost. Home Depot also has special pricing on Miracle-Gro Premium Potting Mix - 60.5 Litre that can be mixed 50:50 or less into your native garden soil. You can also add sheep manure or mushroom compost to energize your soil.

Take a look at the video below where I explain in detail how I fertilize and grow the beloved tomato plant. Let's get planting, my friend.


Thursday 19 May 2016

How to grow climbing cucumbers

Sweet Slice Burpless
A member of the gourd family, the noble cucumber (Cucumis sativum) was cultivated in India over 4,000 years ago. In 1494 it arrived on the shores of Haiti courtesy of Italian explorer Christopher Columbus. In the early 1500's there is evidence it was traded and grown in Montreal, Quebec, Canada by explorer Jacques Cartier. Today, cucumbers are grown around the world with China holding the gold medal for the greatest production.

In general terms, cukes are either pickling, slicing or bitterless types and available in a myriad of varieties due to cross breeding. As you may know, cukes take lots of room in the garden so growing them on a trellis is a great idea for urban gardeners.

Pick a sunny part of your garden and start with preparing the earth with compost or organic fertilizer (triple-mix is ideal) and wait until the outdoor temperature warms up before planting your seed. Cukes will not germinate in cold soil so wait until the end of May or first weekend in June (Ottawa, Canada). If you rush them they don't grow and get stunted. Another option is to germinate the seeds indoors using soil blocks (as demonstrated by the Floret Flowers blog in Mount Vernon, Washington) or use Jiffy-7 peat pellets 2-3 weeks before transplanting outdoor. If you purchase plants at the local nursery, carefully plant the whole tray in one location as cukes don't like to have their roots disturbed. Water and work the soil well before planting.

Growing vertical in a small space
When growing on a trellis I overseed them in a row and then cull the weakest plants. The strongest plants should be approximately 6"-8" apart. When they start to grow I help them grow vertically by wrapping the tendrils (green curly arms) around the trellis. Once they get going they will find their way up the trellis. For the past few years I have been using the concrete wire fence in photo, available at Home Depot, supported by a few bamboo poles. Otherwise you can use jute twine (biodegradable) or nylon fishing twine to create vertical support.

One of my favourites is Sweet Slice available at Stokes Seeds. It is a burpless type that you can eat with the skin. Just try it! Wash it, close your eyes, eat it and you can't tell the difference. Another interesting variety is the smaller, sweet tasting, virtually seedless and smooth/thin skinned Lebanese cucumber. The reason cukes are so refreshing is the 96% water content making them also low in calories. In addition they contribute to a recommended daily requirement of Vitamin K.  "Stay cool as a cucumber", my friend.

Sunday 15 May 2016

How to grow tomatoes upside-down


Defying gravity in your garden: A few years ago the market was abundant with upside-down tomato plants at the Home Depot and local nurseries. It was the rage of garden enthusiasts and created a myriad of discussions at the water cooler and backyard gatherings. Today, it appears that the excitement of an upside-down tomato plant is starting wane in popularity because of it's difficulty to grow, water and manage. However, that has not dampened my determination to defy all odds and succeed at growing cherry tomatoes in this unusual way!

Tomato plants require a large volume of soil (do you remember the photo of the 50" tomato root in my post on March 18th) and lots of moisture as they dry out quickly in the hot sun. In addition the pot gets really heavy and must be secured to a sturdy railing, wall or tree. Understanding these challenges let's get started. I use a fairly large pot around 1 foot square and secure 3 short chains to the pot by drilling holes around the pot edge. The chains will be secured to a steel support that is screwed into my deck about 6 feet off the ground. Using an exacto knife cut a hole in the bottom of the pot big enough to accept a small plant. Then place a small piece of landscape cloth around the hole inside the pot to prevent soil from falling out. Keep the pot away from the tomato stem because when it sways in the wind the pot will cut the stem! Then gently push the plant through the hole and fill the pot with Miracle-Gro Potting mix. One year I tried planting flowers at the top of the pot, however, the flowers only lasted for a short while. The soil capacity was just too small to support the tomato and flowers together.

As the plant grows you will notice the vines trying to reach upwards towards daylight, but as the vine gets larger and laden with tomatoes the weight will bend it towards the ground. I have never had a vine break regardless of the weight. I might add that I always use cherry tomato plants because regular size tomatoes would be too heavy. The real problem is constant watering is required each day and twice a day during the hot summer. I'm also going to try and add more fertilizer and that should help.

You may also want to try the Lee Valley Tools pot that is specifically designed for upside-down plants. It has a unique watering system with a wick. I'm trying one this summer, so I will give you some feedback later in the summer. Topsy-Turvy upside-down, my friend.